Strawberry Banana Oatmeal

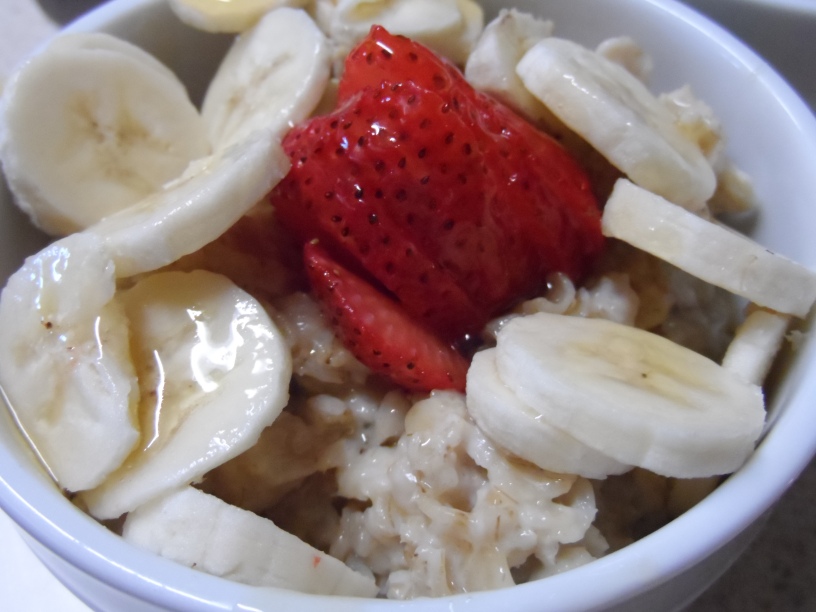
Strawberry Banana Oatmeal drizzled with Honey

Mmm Mmm Good!

I ♥ when fresh berries are in season! I try to incorporate them into meal time as often as possible. Most folks do this at breakfast but we’re not breakfast people around here. Correction, I’M not a breakfast person. Correction again, I’m not a breakfast ‘morning‘ person. Haha, at least I own it, right?  🙂SAM_0433

Since I’m not a morning breakfast person (coffee, YES please!) I enjoy making sweet but healthy breakfast dishes that ‘fill us up’ without ‘filling us up’ for dinner.

(Catch what I did there? 😉 )

I think oatmeal works exceptionally well, all n all, as it is a perfectly delicious base helping to display your summertime sweet rewards front and center; it’s hearty, healthy and it is a snap to prepare in 10 minuets (or less)!

I used four ingredients:

  • Oatmeal (I used Quaker Quick Oats)
  • 1 thin sliced banana
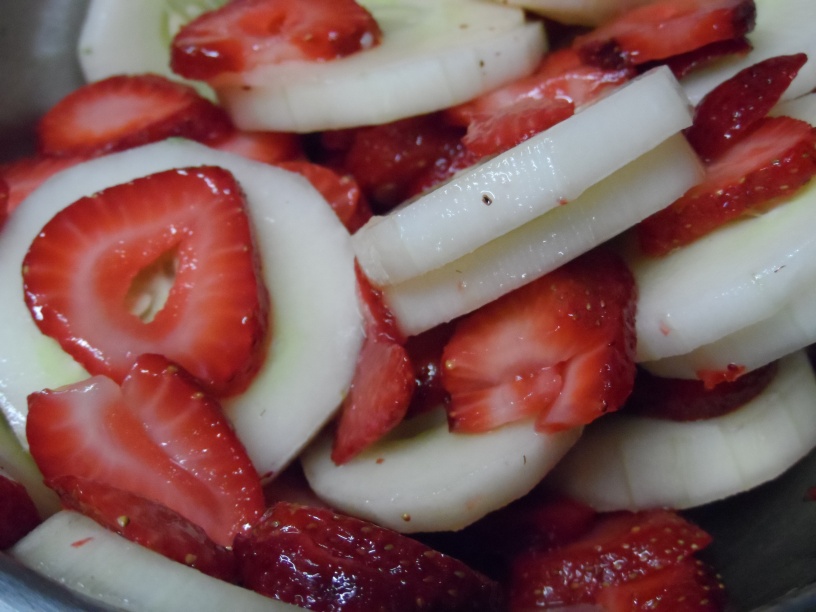
  • 4-5 strawberries, sliced
  • Honey

Add sliced berries to the center of the oatmeal mound, layering banana slices around outer edge. Next, drizzle honey over all for a light sweet addition to the oats. Definitely a meal deal on evenings when its still topping at a whopping 108 outside!SAM_0437

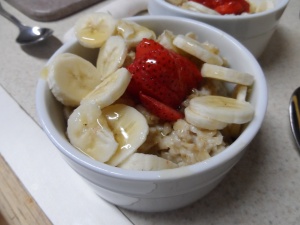
Whew, help me I’m melting! 🙂

Breakfast can be made as decadent or as savory as you desire. Simply depends on how much time you want to spend in the kitchen. Me, on nights like tonight – Um, no, not so much… Even with air conditioning, once the heat zaps you – you’re just simply zapped. So this chic is gonna re-hydrate, replenish and relax with hubs! ♥

SAM_0436 


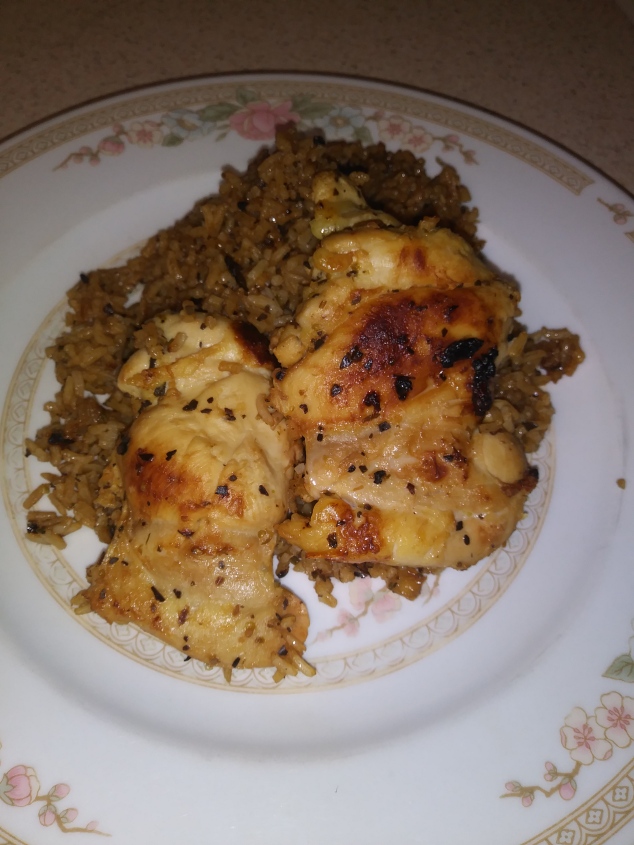
Dinner has been served! 


We also included a couple slices of buttered toast along side our bowl of goodness. Add pecans, cranberries, blueberries, bacon 🙂 ~ whatever your hunger craves.

What is your favorite breakfast meal to make for dinner?

Til Next Time ~

Domesticate Rebellion

THRIVING ~ Have you witnessed the testimonies? It’s not about weight loss; it IS about feeling better from the inside out! If interested I would love to help you! Knowledge is Power! Sign-up for a FREE account & information at https://domesticated.le-vel.com

DISCLAIMER: This post may contain affiliate links meaning if you click & buy, I may be compensated. So, Thank you!

Strawberry Cucumber Salad

Strawberry Cucumber Salad tossed in Honey & White Wine Vinegar

Have you heard? I can grow a badass cucumber! It all started in the compost

…I’m one of those people who will see something in a picture and more often than not, convince myself  “Hey, I can do that!”, and off I set to do ‘whatever‘ without really researching the ‘how to’ behind the project… Sound familiar? Know anyone else like this? Well in this instance, it was composting. I mean seriously, how hard can it be to allow stuff to decompose, Right?  So I built a box out of pallet leftovers setting a drum from an old washing machine in the center to hold my ‘stuff’. cucumbers
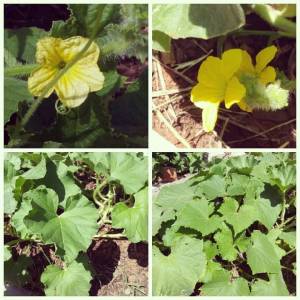
Making sure the cover would lock to keep critters out, ensuring airflow ~ I felt good about my recycling endeavor and started filling the drum with kitchen scraps & garden trimmings, turning it daily as I had interpreted from the pic. Payday happened at the beginning of Spring 2018 when my efforts were rewarded with beautiful black rich soil! WHOOT! I was so excited at my success! 🙂 As soon as it was warm enough that black gold was spread over every single raised bed, used in all my pots and even layered in some ground areas. Anticipation grew as I soon started seeing little sprouts everywhere. Yay! I was all happy with myself; maybe I do have a green thumb… HaHaHa, If Only! Ya see, all the sprouts were IDENTICAL. Every pot. Every bed. Every spot I used my black gold had the exact same sprout. 

Each sprout I have since learned was a cucumber plant! (a few were cantaloupes)

Apparently, I need to research more about composting because when I discarded my cucumber vines with some cucumbers last year, the seeds did not decomp as I expected and were dispersed throughout my entire garden this year! SMH! Imagine my surprise when cucumbers started coming up where I had planted corn! And cantaloupe! And tomatoes in my potatoes! WTH? It’s funny now but I’ve had to do some serious searching for cucumber inspired recipes…

Thus, bringing this ingenious lovely into my life! Simple, easy, 4 ingredients! Think of it as ‘Summer in a Side’!SAM_0429

Ingredients:

  • 1/2 cup Honey
  • 1/8 – 1/4 cup White Wine Vinegar
  • 1 large Cucumber
  • 1 pint Strawberries

Mix vinegar & honey in a small bowl. I suggest this motto: “Less is Best, Taste as you Go” to ensure the vinegar isn’t overpowering the sweetness I started with 1/8 cup and continued until it fancied my flavor! 😉

Peel and slice your cucumber into rounds

Slice the strawberries after washing and removing stems, adding to bowl of cucumbers. Pour the honey mixture over the fruits, tossing gently to dress each slice. Cover and chill before serving.SAM_0431


SAM_0433


Oh, food for thought: to cut small fruits like strawberries, olives, or mushrooms I ♥ this ~ Works Perfectly so hands of grands can assist without concern of cutting themselves!

Surfing through Pinterest as I usually do for inspiration I stumbled across a pin that led me to Karen over at   https://thefoodcharlatan.com with her re-make from the cookbook Our Sweet Basil Kitchen by Oh Sweet Basil. Both recipe curators use balsamic for this dish. I chose white wine vinegar as it has less bite IMO compared to balsamic versions. But don’t take just my word, you should try all three for yourself!

Til Next Time ~

Domesticate Rebellion

THRIVING ~ Have you witnessed the testimonies? It’s not about weight loss; it IS about feeling better from the inside out! If interested I would love to help you! Knowledge is Power! Sign-up for a FREE account & information at https://domesticated.le-vel.com

DISCLAIMER: This post may contain affiliate links meaning if you click & buy, I may be compensated. So, Thank you!

CRUNCHY ZUCCHINI BITES

Crunchy Zucchini Bites

Have you noticed summer is here? I assure you it is peaking in my neck of the woods.  Bringing record-breaking, scorching, hell-like heat with it too! WOW! Sadly, for many of my garden edibles the heat has been nothing less than brutal. The increased temps left me just a single zucchini ready for picking this morning. Hmph! Nature can be a beast sometimes. 😦

However, being the single beauty was of good size I decided I wanted to stretch it between the hubs & I as a side.

And I Did! Just look at these crispy bites of yum! Here is how I did it:  SAM_0407

  • 1 zucchini
  • 1 cup vegetable oil
  • 1 1/2 tsp garlic powder
  • 1 cup panko bread crumbs
  •  2 eggs, beaten
  • 1 cup all-purpose flour
  • 1/2 cup grated Parmesan cheese
  • salt/pepper to taste
  1. Peel zucchini then cut into 1/8″ rounds
  2. Grate 1/2 cup parmesan cheese into the Panko, add garlic powder & mix well
  3. Beat 2 eggs
  4. In a fry pan, heat some oil to medium – high
  5. Dredge the rounds in your flour
  6. dip thoroughly in egg
  7. press into the panko parm breading mix being sure to cover each side
  8. Fry in batches about 2-3 minutes each side until the centers are soft and the outside is crispy, crunchy golden brown .
  9. Remove from oil, place on paper towel salting to taste

SAM_0415
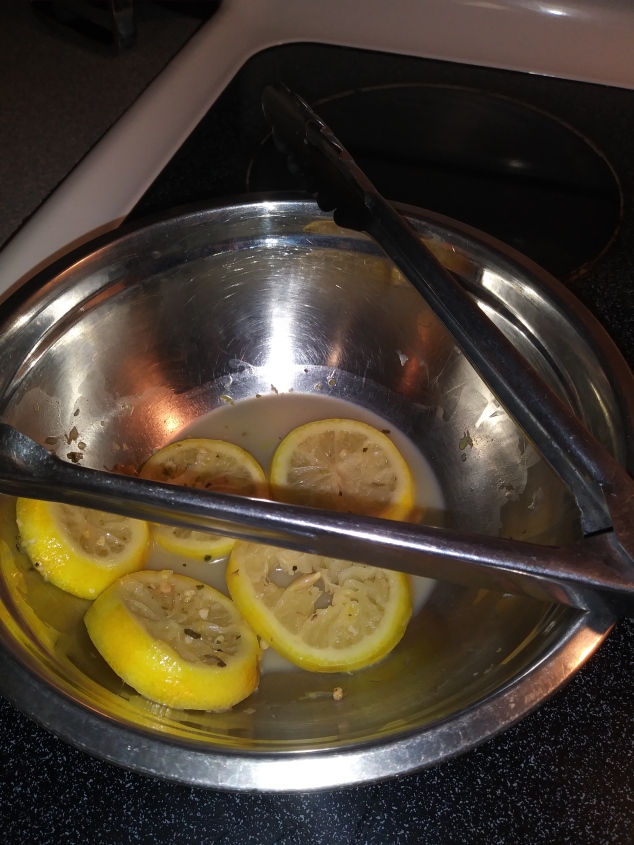
These lovelies were paired with grilled chicken, fluffy potato and out of this world crunchy zucchini bites! If you’re a texture person as I am, then you will enjoy the crispy crunch ~ A total knock out thanks to the Panko (Japanese bread crumbs).

Another “Thank you” to Chungah over at #DamnDelicious for her recipe inspiration!SAM_0439

During all seasons we get to enjoy grilling thanks to my counter-top grill. Electric, removable grate & removable drip pan. ♥♥♥

Such an effective way to 71tRQFahuML._SL1500_bring the flavors & textures of outdoors inside without feeling the heat!

If you enjoy grilling as much as I do, but don’t want to melt in the rising temperatures outside, here is a newer version counter-top grill by Hamilton Beach   https://amzn.to/2LuVlpFd. 

Time to get your grill on!

Til Next Time ~

Domesticate Rebellion

THRIVING ~ Have you witnessed the testimonies? It’s not about weight loss; it IS about feeling better from the inside out! If interested I would love to help you! Knowledge is Power! Sign-up for a FREE account & information at https://domesticated.le-vel.com

 
  • DISCLAIMER: This post may contain affiliate links meaning if you click & buy, I may be compensated. So, Thank you!


Cinnamon Rolls

Cinnamon Rolls ~ Old School Recipe

A single place where good & gooey and sweet & sugary combine together with unforgettable buttery flavor.36254916_10211428705136646_4452179037657235456_n

Impressingly it was pure nostalgia coming from my oven the afternoon I decided to try these on for size. A whiff of reminiscences crepted thru my kitchen to fill every room in the house. Provoking memories of yester-year while inticing current hunger… and, instead of satisfying that hunger with something resembling lunch ~ I waited.  I waited for these beauties to be done. Correction: WE waited.

Um… Dare I testify: don’t do that!” For Realz! This is NOT one of those “do as I do” moments. Otherwise you will accidentally eat them all like we did! (well, almost all) #sugarrush

I’m not sure “how old” equals “old school” either but if you are, let’s say, 30 years or older then you might recall when fresh hand-made cinnamon rolls were actually rolled out by your cafeteria ladies. SAM_0049

They were one of the best things about school.

Of course, this was wwwwaaaayyyyy before we cared about the calorie intake of our student body. When pizza was tasty, sloppy joes were greasy and whole milk was available in white and chocolate! Before the public school lunches were hijacked.

Oh, how I recall wheeling & dealing for any extra cinnamon rolls too. I’d wipe tables, put up trays, stack chairs. #MmmMmmSoGood

My fave way to eat them was to unwind each roll so I could enjoy the soft tender dough, layer by layer. Occasionally, anticipation or lack of remaining lunch time would force me to simply sink deep into the center, combining all of those layers into a single sticky mouthful! Either way, I always tasted the sugary glaze first, followed by nuttiness of pecans ~ a slight sweetness from the dough ~ ending with a buttery, sugary, cinnamonSAM_0051

burst bouncing over my taste buds beginning at the tip of my tongue with each bite.

In my opinion, even the cinnamon rolls sold at the State Fair are not as good as the ones from school ‘back in the day.

So if you’re ready for your taste buds to take a trip down memory lane (or simply want a bomb ass cinnamon roll, head to the pantry with this recipe in hand:

SAM_0052

Dough Ingredients:

  • 2 pkgs. yeast
  • 2 cups warm milk
  • 1/4 cup plus 1 tbsp brown sugar
  • 1 tsp salt (omit if you use salted butter)
  • 2 tbsp softened butter
  • 5 cups all-purpose flour (for softer dough add 1 egg & increase butter to 1/4 cup)

Filling:

  • 3/4 lb butter
  • 1 1/3 cups sugar
  • 1 1/2 cups brown sugar
  • 3 tbsp cinnamon

Glaze:

  • 2 1/4 cups confectioners sugar
  • 1/2 cup warm water
  • 1 tsp vanilla


Dissolve yeast in milk. Add sugar, salt & butter. Mix Well. Add flour gradually mixing well after each addition. Knead and let rise until double in bulk. Heavily butter two 9×13 pans. Lightly oil board (or flour counter) and roll out dough into a 1/4 inch thick rectangle. Spread filling evenly over dough. Roll up tightly, sealing edges. Let rise until double.

Bake in a preheated 350 degree oven for 25 minutes.

Glaze as soon as they come out of the oven.

IMG_20180626_161306_844

I have to credit my cousin for sharing this recipe (Thanks Cuzz!) & http://www.cook.com

Note: I only baked 1/2 of a batch tossing the other 1/2 in the freezer without adding the filling & before the second rise.

The dough freezes well for future cinnamon roll treats! #thereisyourtwofer

Do you have a favorite from past school days? Yeast Rolls were my #2!


Til Next Time ~

Domesticated Rebellion

Disclaimer: This specific writing does not contain affiliate links but my site does. Meaning when you visit ~ if you click & buy, I could be compensated.

So, Thank You!

Roasted Tomatoes

IT’S OFFICIALLY SPRING Y’ALL!

I know its been a minute since I last posted but see, we have these lil peoples that sometimes like to visit ‘the farm’. Not our littles but ‘Grand Littles‘… Hmm, catchy… Remember you heard it here 1st if it becomes a thing.  🙂  So, we’ve had a few of our grands out sporadically over the past couple of weeks. Assisting this Mimi in getting into the Spring of things… We cooked, we gardened, we explored & hunted, and we painted rocks. We had lazy mornings, some cReAtiVe afternoons, and fun evenings ending late into the night. But alas, giggles, grins, and all things ‘grand’ come to an end as they go back home returning to friends, school and routine ~ leaving the hubs and I to return to our less structured but nonetheless routine as well.

*sigh*

I’m sure some of you can relate that after a couple of weeks of consuming more than our fair share of pizza, mac & cheese, waffles with whipped cream, chili dogs, chicken nuggets and s’mores 260(and more) my body is demanding what it has been lacking: Some healthy! Yes, we ARE those kind of Mimi/Papa’s and Yes, I seriously feel like a Weeble

“🎼Weebles wobble ♪ but ♪ we don’t fall down ♪.”   

Perusing the isles of the market the other day we spotted some beautiful plump hot-house tomatoes & I just had to have them. They screamed to me: “SPRING IS HERE”.  I was hoping to find some inspiration for a light yet filling dinner & here it was.  Now, I’m not a science guru so don’t get all nerdy on me because I’m not 100% sure just how ‘healthy’ tomatoes are. However, what I do know is we love them and they are not full of sugar or carbs. So in my book – that’s healthy enough for tonight! I’ll consult Google on the matter later tho. 😉

We made it home with our purchases in hand and a grumble in our stomach. It didn’t take long to prep & pop these babies in the oven. Easy Peasy folks!

Imagine if you can… 250

Tomatoes roasting, sizzling in EVOO, complete with garlic, basil, rosemary, thyme and oregano… Scrumptious bits bursting with flavor in each mouth-watering bite! Just enough tang to get your jaw to slightly clinch initiating your saliva glands into some double duty action. AhHaha Yes, you DO know! 🙂

However, no one eats just tomatoes for dinner! Although fresh fruits serve as a delightful snack the hubs requires a bit more substance in his meal so these beauties were paired with some polenta to complete our light but yet filling dinner!

18953912cdaa467b255f9ef0b44cf4f6
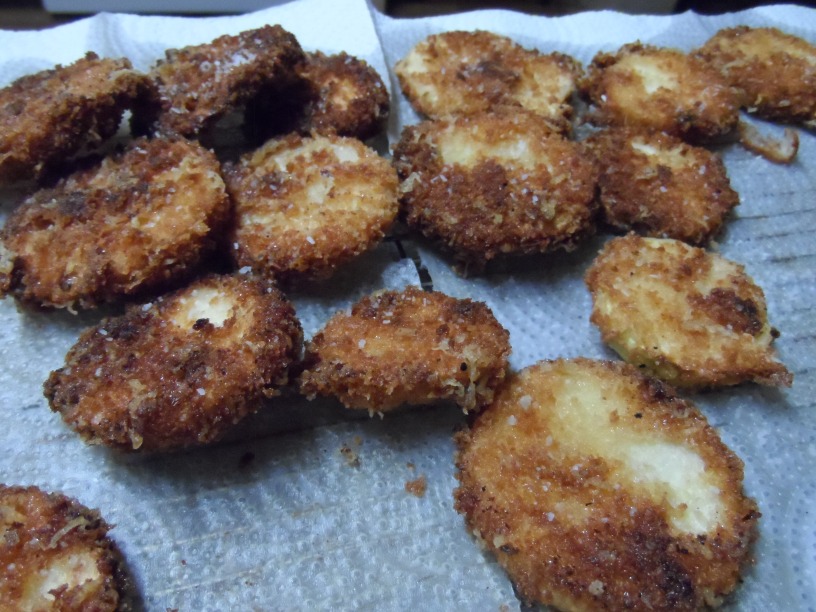
Polenta is a dish that originated in Italy. It is a dish of boiled cornmeal that was historically made from other grains. It may be served as a hot porridge/cereal, or it may be allowed to cool and solidify into a loaf that can be baked, fried, or grilled.  I always use the brand Bob Mills. Food for Thought: I originally believed polenta & grits were the same. They are not. Polenta is yellow corn while grits are white corn, specifically hominy. (Ah ha, that explains my dislike of grits!)

To make this preheat oven to 425 degrees and gather up:

  • 4-5 ripe tomatoes, slice & lay out on a sheet pan lined with foil/parchment or a Silpat 
  • 2-3 Tbs EVOO to drizzle over all
  • 1-2 cloves of garlic, minced & sprinkled evenly over each slice
  • Mix together 1 tsp each: Rosemary, Thyme, Oregano and Basil (or use 1 1/2 Tbs Italian herb mixture) and sprinkle over each tomato slice
  • Salt & pepper to liking

Roast tomatoes for 30-45 minutes. Plenty of time to prepare the polenta your favorite way and shred some parmesan cheese. MMMmmm, Our belly’s said “Thank you”!  Do you like roasted tomatoes? Let me know what you would pair with them.

Note to Self: One thing for sure, Grands remind me that I am not as young as I once was but I am as young as I ever will be again!

Til Next Time,

Domesticated Rebellion

THRIVING ~ Have you witnessed the testimonies? It’s not about weight loss; it IS about feeling better from the inside out! If interested I would love to help you! Sign-up for a free account at https://domesticated.le-vel.com

 
  • DISCLAIMER: This post may contain affiliate links meaning if you click & buy, I may be compensated. So, Thank you!


Butternut Squash Soup – Roasted Style

Let me preface this post with some full disclosure friends: I HEART FRESH VEGGIES! Although I am not a vegetarian ~ I am a huge fan of all plant-based edibles! 😉 LOL

Veggies are my saving grace from food boredom.  I love how they are so forgiving & provide me some versatility in how I cook them. Rather the fry pan, baked in the oven or perhaps some steaming. Maybe grilling on an open flame, even the crock pot or saute — However you prefer vegetables — to me, in a word, they ROCK! As does this recipe…

Simple. Easy. And the word that will either scare you away or pull you in….. HEALTHY! A melt in your mouth good kind of healthy!

008

PSA bonus: This soup is extra healthy (IMO) as there is zero cream and zero butter. If I didn’t make it myself, I wouldn’t know it lacked either of these ingredients because it is exceptionally silky smooth. The natural flavors meld together seamlessly to create a sweet but earthy deepness. A taste bud trip that can only be taken on the roasting road. *YUM* Isn’t it amazing the different textures/tastes each cooking method brings out of each type of vegetable? I could go on and on about my discoveries but I’ll save those explorations for another post.  Moving on… To make this beautiful soup, you simply put all your vegetables together in a roasting pan. The flavors combine while roasting, meaning your oven does the heavy lifting for you.  Another #SCORE!


I roasted together:

  • 1 butternut squash, peeled and diced into 1′ sections
  • 1 large sweet onion chopped into large chunks
  • 3 large carrots peeled and chopped
  • Thyme & Rosemary to taste (can use either fresh or dried – don’t forget to remove any stems before puree if you use fresh herbs)
  • Salt & Pepper to taste
  • Dash of Hot Sauce (Texas Pete)
  • 3 cloves diced garlic (distributed evenly)
  • 3 cups vegetable broth – 1/2c to 1c for puree use the rest for final soup coupling
  • 2 TSP EVOO

Peel, cut and clean all of your vegetables. Combine everything together with oil and spices in your roasting pan then roast in the oven at 400′ until everything is fork tender. (Personally, I let it all go until the edges began to burn & each morsel glistened with droplets of natural juices making way to the surface.) Ah Yes, slightly crispy outside with tender fluffy insides. Once cooked as desired, remove from oven and put into a food processor pulsing with just enough vegetable broth until smooth and silky. Once all of your vegetables are pureed, add them to a sauce pan with the remaining broth. Simmer for about 10 minutes tasting and add more seasoning if needed, stir to combine and Enjoy! It really is that easy!

I only tweaked this recipe slightly. And that was by omission of any product called for that I didn’t have on hand; specifically sage leaves, celery and red pepper. No matter though, I can tell you it was scrumptious. No guilt. Very Filling. And Very Good For you! I hope you try it. If you look closely, you’ll see I did add cream in a moment of weakness. Don’t judge! 🙂

As always, hit me up and let me know what you think! If you switch it up, do share!

Til next time ~

Domesticated Rebellion

To see the original recipe visit www.aheadofthyme.com or click HERE.

  • DISCLAIMER: This post contains affiliate links meaning if you click & buy, I may be compensated. Thank you!


Baked Pork Chops & More

Baked Thin Pork Chops

Well Hello there! I hope your ready for a beautiful & tasty recipe that is so exceptionally easy to make & easy on the pocket! Double Whammy! Minimal ingredients plus minimal work equals a delish dinner on the table in less than hour.

I discovered this in my fave online app. Ah Haha, You know it too ~ Pinterest! Scrumptious ideas created and shared by culinary lovelies everywhere! Yuummm! But hey, let me stay on track here and get back to DINNER!

The original version belongs to Vicki over at Avocado Pesto; you really should check her out! This recipe is a family tradition passed down a few generations, from her mother & grandmother! And she has gluten free suggestions folks! 

Time tested! Taste tested! And now, MY family 100% approved

There are only four – repeat 1-2-3-4 ingredients. You seriously can not go wrong making this. Thin pork chops topped with mayo, onion and cheddar cheese come together deliciously. Baked @ 350. Effortless never tasted so good!

Here are my thin breakfast chops. She is adamant to use thin pork chops, “The thinner the better”. This sparked a happy dance on my end as while shopping I mistakenly picked up breakfast cut chops!

Did you know there was a difference between Thin cut and Breakfast cut?  Well, Welcome me to the land of Duh!1205171751

As instructed, even though these are super duper thin, I still tenderized with a meat hammer.


In this snap, the breakfast cut chops are seasoned with salt, pepper and sprinkled with dehydrated minced onion. (Did you cringe while reading that?) Usually, I have onions EXCEPT of course last night. And ordinarily, I wouldn’t use minced dehydrated onion but it worked in a pinch.


Not to mention it kept this lazy girl from a road trip to the store. (Yay)

3631[1]

Okay, confession time… I kinda panicked seeing how thin these exactly were. You know that feeling of “Oh Shit, there isn’t enough for everybody feeling”? Ya, decided last-minute to make a couple of sides just to be safe. Better to have too much than not enough, right? And wouldn’t you know it, my multi-tasking skills were so off yesterday there is only one single picture of the *bonus* recipes which happens to be my plate! Gotta work on that picture thing! LOL! But you can see more pics in the referring links below; no worries.

Feast your eyes! Simple home comfort! Thin baked cheesy & juicy pork chops, left-over cornbread sage dressing w/ gravy, parmesan peas, french onion rice accompanied with brown n serve dinner rolls! I’d say I had nothing to be worried about in the quantity department too!

1205171852a


BTW, These turned out amazing! Both *bonus* recipes turned out fantastic too! Both were Capital ‘E’ Easy & made with basic pantry staples. Whip up these sides in a frenzy for unexpected dinner guests to ensure you have plenty to go around!

French Onion Rice by Seduction in the KitchenParmesan Peas by Ezra Pound Cake. Each are extraordinarily talented and have provided me with much inspiration on multiple occasions!

Hope you enjoy!

Til Next Time ~

Domesticated Rebellion

Leftover Turkey Enchilada Casserole

Ya know the saying “Life goes on“? Well, it does! So does the life of the Thanksgiving turkey. Its edible life that is.

Historically, I have never really enjoyed turkey; much less leftover turkey. I’m more about the cornbread sage dressing with gravy and Ham. Turkey, meh. But on the serious, what would Thanksgiving be without turkey?

Hmmm, I guess it would still be Thanksgiving. Go figure. However, the point is we always have left over turkey. Doesn’t everyone? In years past, it would normally get ground up & made into turkey salad but… wait for it….

I’m not a big fan of the ground version. Or the turkey salad hubby always makes. Only took 20 years for my secret to get out, lol.. And, at risk of sounding like my mom – this year I decided to embrace her motto (or whoever it was) ‘Waste not – want not‘ and off I was to do (or not do) just that.

Therefore, lookout Pinterest, here I come! Have I told you how much I love Pinterest!?!

Anyway, cruising thru Pinterest boards I came across a couple of recipes. One for Turkey Enchiladas (I’ve made enchiladas before with chicken, beef or pork but never turkey). And the other, Turkey Carnitas. Did you know: Carnitas, literally meaning “little meats”, is a dish of Mexican cuisine originating from the state of Michoacán. Carnitas are made by braising or simmering pork in oil or preferably lard until tender. Wikipedia

So after seeing both recipes, not being able to decide which one I wanted to try; Yup, you know it.. I mixed them up! Be sure to click on the links for the individual recipes.

Shhh, not to brag or anything but the results were outstanding according to hubs & son. Not too shabby if I do say so myself too!

First, I decided to crisp up my turkey (think carnitas!) Next, I grilled sweet onions. (I know crazy huh? Onions are not typical with enchiladas BUT neither is turkey!) When I pulled out my corn tortillas I discovered they were starting to crumble around one of the edges. Even though I had another package on hand, I decided to make the enchiladas into a casserole using up those bad boys. Bad being good in this case.

3376[1]

The rest I think is fairly typical. I put a couple of spoonfuls of Green Chili Enchilada sauce on the bottom of my pan, layered corn tortillas on top followed by refried beans, sour cream, braised turkey, grilled onion, black beans, cheddar cheese and more sauce. I have two layers working here which was plenty! *Red sauce would work well; use what you prefer and like

Once you complete your layers ~ Smoosh them puppies down with a spatula so your green sauce & cheese topping don’t bubble over in the oven. Bake @ 400 until hot and the cheese is melted.

This is filling. Cheesy. Spicy but doesn’t have to be. And perfect use of the leftover turkey. This might just become my future go-to!

What do you do with your Turkey leftovers?

Til Next Time~

Domesticated Rebellion


One pot Greek Chicken with Lemon Rice

Chicken and Rice.. I know, I know, your probably thinking Oh Joy it’s ANOTHER Chicken recipe, Yaaaay. Well fellow cooks, don’t be fooled by its name – this one is a game changer!

Tender juicy chicken, FRESH lemony tang but not too tart. (The hubs likes all things lemon; me, meh, not so much.. But since it is him that I aim to please in this culinary fetish I have discovered I gave it a whirl.)

ShaZam! Taste bud heaven!

Now before we go much further, let me preface by saying I NEVER follow a recipe 100%. I ALWAYS put my spin on it to fit our tastes and more so, to fit what is on hand. She provided the bare bones, I provided what was in the pantry… My kind of teamwork!

BTW, Here is where you can find the original version:  On Pot Greek Chicken & Lemon Rice

Follow Nagi – She Is Amazing! I found her recipe on a Pinterest board. I have bookmarked her site & troll for inspiration way more often than I realized…. I was scrolling through her index and was thinking, Hey, I made that too. (and that, and that, and that… Ya, I got it bad!)

Note: Her snap is so much prettier than mine & I’m okay with that! Remember, she provided the bare bones then I used what was on hand. (How many of you put your own spin on recipes?)

Her rice is gorgeous and golden. Her chicken has an incredible beautiful crust. And for y’all folks who like the nutritional break down, she provides it all! Inclusive of notes with options like no other! Very helpful! Seriously. You should seek her out! (I am not being paid for this recommendation either!)

Marinade consists of lemon juice, garlic, oregano and salt. I allowed my chicken to marinade for about two hours. *Be sure to save your marinade! (I totally kinda ditzed on the pictures as we were H.U.N.G.R.Y. I grabbed my camera as an after thought.. My Bad!)

1120171758a


I used boneless thighs. Would definitely prefer skin on and with the bone, but that was yesterday’s dinner! This totally smelled my house up with scrumptious anticipation!

1120171758

I didn’t drain the fat (Honestly, there was not very much to drain IMO) nor did I toss out the brown bits after searing the chicken. And, once I sauted my onions in the drippings, since there wasn’t really enough fat in my opinion to worry about, in went the rice with the chicken broth and water.

Thus, darker rice..

But in my defense, I simply could not toss out that beautiful flavor left behind after searing the thighs! (And I read in her comments where another follower concurred!)

And lastly, I used instant rice. I only had to adjust my cooking time in the oven as to ensure the bottom of the cast iron skillet didn’t burn. But I assure you, the flavors melded perfectly!

Ta Dah.. Simple. Easy. One Pan. Less than hour. Taste bud heaven!

1120171906

Hope you enjoy! If you switch it up, let me know! I’m always seeking inspiration!

Til Next Time

Domesticated Rebellion

Comfort at its finest!

Simple. Delicious. And only 5 ingredients. #yum

This is my remake of Sunny’s 5 ingredient Spicy Sausage Carbonara. (Food Networks ‘The Kitchen’)

http://www.foodnetwork.com/recipes/sunny-anderson/sunnys-5-ingredient-spicy-sausage-carbonara-3438247

I discovered “carbonara” is simply a description of an Italian dish from Rome made with pasta, eggs, meat and hard type cheese (I 💗 parm).

And… You can use your favorite pasta and meat to switch it up as your own. This was a super hit at our place!

Enjoy!

Til next time~

Domesticated Rebellion