Cranberry Lemon Scones

Cranberry Lemon Scones will delight your tongue with a bright lemony flavor that is highlighted by small intense bursts of cranberry morsels tucked into each bite!

Y’all, these are seriously so-so good!

SAM_0681

Scones, much like a biscuit in texture are versatile; I’m learning they go with practically anything you decide to put with them.

Savory meat gravies, tomato & herb sauces or sweetened up with choices like strawberries, peaches or as the name implies Cranberry and Lemon!

(BTW, I wouldn’t pass one up with just butter & jam either. Just saying…)

As for the lemon aspect to these; my lifetime lemon meter got tanked off as a kid when I use to suck down lemon juice packets. Rest assured these are not like biting into a lemon wedge or drinking concentrated lemon juice. Not even close! While these lovelies do have the zest of 3 lemons they’re not tart.

Your jaw will not seize up nor will your saliva glands over react. *Yay*

The zest lightens the dough just enough to give it a hint of sunshine.  🙂

SAM_0683

The freshness of the lemon followed by varied levels of cranberry ending with a sweetened lemon glaze drizzled over the top —

*Holy YUM Moley*

Are you hungry yet?

Well, let’s get baking!

Grab up the following ingredients:

  • 2 1/4 cups A/P Flour
  • 1/3 cup sugar
  • 3 tsp baking powder
  • 1/4 tsp salt
  • 1/2 cup dried cranberries
  • 3 Tsp lemon zest (I used zest f/ 3 lemons packing the 3 Tsp)
  • 1/2 cup butter (cold!)
  • 1 egg
  • 3/4 cup milk
  • GLAZEMix together 1 Tbs milk, 1 Tbs lemon juice & 1/4 c powdered sugar

Directions:

  1. Pre-heat oven to 400 degrees.
  2. Mix egg into your milk; set aside.
  3. Whisk your dry ingredients together in a bowl.
  4. Cut cold butter into your dry ingredients until you get a crumbly mix.
  5. Mix in cranberries & zest.
  6. Pour milk/egg into bowl with your dry ingredients & mix gently until dough is just wet. 
  7. Tumble dough onto a pizza stone sprinkled slightly with flour.
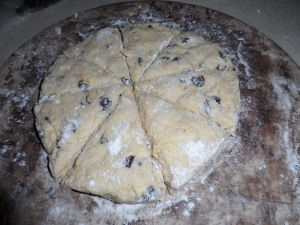
  8. Form into 8 inch round by 1 inch deep.
  9. Score into eight equal pieces.
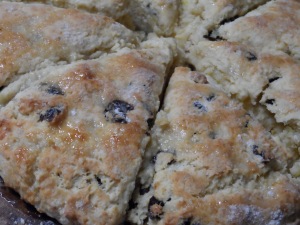
  10. Bake 30 minutes. Remove when golden brown & crusty all around, on top and in between each slice.
  11. Allow to cool before drizzling with glaze 
  12. Lastly ~ Enjoy! 🙂

Mmm Mmm Good!

Sink your teeth into a version of your own & come back to share!

SAM_0687

By the way, this was my first time to make scones.

I thought my batter was too wet.

Trust me, it was not.

The wet batter cooked to perfection leaving a toasty light brown outside and crumbly inside!

Lately, I’ve become infatuated with all the different varieties I can make.

I followed this recipe exactly but will soon experiment with my own twists to bring you my usual #twofer 🙂 SAM_0693

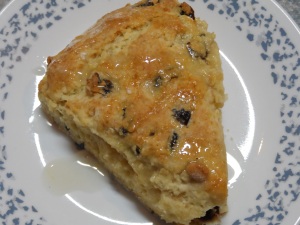
Credit for the original gorgeous beauty goes to Steve over at The Black Peppercorn! I’m seriously going to be stalking the recipe isle. Head over and say Hello!

Til Next Time ~

Domesticated Rebellion

THRIVING ~ Have you witnessed the testimonies? It’s not about weight loss; it IS about feeling better from the inside out! If interested I would love to help you! Knowledge is Power! Sign-up for a FREE account & information at https://domesticated.le-vel.com

DISCLAIMER: This post may contain affiliate links meaning if you click & buy, I may be compensated. So, Thank you!

Brownies from Scratch

Brownies from Scratch

Dudes — the #twofer for Brownies from Scratch recipe is 1st a wonderful fudge type brownie (right out of the oven) OR 2nd let it stand for a moist cake like consistency when left to completely cool. Two results – One recipe! #Score

Anyway you like it ~ Anyway you want it ~ there simply are not any wrong answers here!  😉

This makes one 8×8 pan. Just big enough to satisfy a hungry grand & her Papa; (plus, leaving a few for a grand breakfast the next morning!)

0713182123

Ingredients:

  • 1c sugar
  • 1/2c flour
  • 1/3c cocoa
  • 1/4 tsp salt (See Note)
  • 1/4 tsp baking powder
  • 2 eggs
  • 1/2c vegetable oil
  • 1 tsp Vanilla

Mix everything together thoroughly, ensuring there are no lumps or bumps. Spray an 8×8 pan with PAM or grease with butter. Preheat oven to 350 degrees. Bake for 20 – 25 minutes.

Note : I happen to think these were great just as they were BUT our grand is honing in her palate to which she informed me “there was too much salt”. So, may I suggest a tasting before baking to ensure the salt factor isn’t over powering for your palate!

And seriously, I encourage you to play around with texture & flavor by tossing in some roasted pecans, walnuts, or almonds. Another lovely combo is to swirl in 1/4 c peanut butter or chocolate chips. The options are endless!  0714181010

Brownies from Scratch can be stored (or gifted!) by mixing-up all of the dry ingredients in a Ziploc bag. Be sure to label the outside with wet ingredients, oven temperature and timing. Perfect for a quick late night craving or as an addition to a gift basket for a new mom or college student.

I’m always searching out new recipes and while these are sure to tame the cravings of chocoholics everywhere, I came across them totally by mishap. Y’all know I go to Pinterest for inspiration from other cooks. It was there, I came across a pin for brownies leading me to www.afewshortcuts.com and Amanda who shared a different scratch brownie recipe. However, I quickly realized the pinned shortcut recipe wasn’t the same as the recipe image that caught my eye. And full disclosure; Brownies from Scratch was copied from the image.

I sure wish I knew who to thank for sharing. If you know who curated this lovely gem, won’t you send them my way? Click to be taken to the original pin.

Do you have a young aspiring cook in the family?

Stonewall Kitchen Farmhouse Batter Bowl GiftEncourage their passion with this Stonewall Kitchen Farmhouse Batter Bowl Gift (Click Here) Inspiring breakfast everywhere!


Till Next Time ~

Domesticated Rebellion


Disclaimer: This writing contains affiliate marketing links. Meaning, if you visit, click & buy – I could be compensated. So, Thank You!


Cinnamon Rolls

Cinnamon Rolls ~ Old School Recipe

A single place where good & gooey and sweet & sugary combine together with unforgettable buttery flavor.36254916_10211428705136646_4452179037657235456_n

Impressingly it was pure nostalgia coming from my oven the afternoon I decided to try these on for size. A whiff of reminiscences crepted thru my kitchen to fill every room in the house. Provoking memories of yester-year while inticing current hunger… and, instead of satisfying that hunger with something resembling lunch ~ I waited.  I waited for these beauties to be done. Correction: WE waited.

Um… Dare I testify: don’t do that!” For Realz! This is NOT one of those “do as I do” moments. Otherwise you will accidentally eat them all like we did! (well, almost all) #sugarrush

I’m not sure “how old” equals “old school” either but if you are, let’s say, 30 years or older then you might recall when fresh hand-made cinnamon rolls were actually rolled out by your cafeteria ladies. SAM_0049

They were one of the best things about school.

Of course, this was wwwwaaaayyyyy before we cared about the calorie intake of our student body. When pizza was tasty, sloppy joes were greasy and whole milk was available in white and chocolate! Before the public school lunches were hijacked.

Oh, how I recall wheeling & dealing for any extra cinnamon rolls too. I’d wipe tables, put up trays, stack chairs. #MmmMmmSoGood

My fave way to eat them was to unwind each roll so I could enjoy the soft tender dough, layer by layer. Occasionally, anticipation or lack of remaining lunch time would force me to simply sink deep into the center, combining all of those layers into a single sticky mouthful! Either way, I always tasted the sugary glaze first, followed by nuttiness of pecans ~ a slight sweetness from the dough ~ ending with a buttery, sugary, cinnamonSAM_0051

burst bouncing over my taste buds beginning at the tip of my tongue with each bite.

In my opinion, even the cinnamon rolls sold at the State Fair are not as good as the ones from school ‘back in the day.

So if you’re ready for your taste buds to take a trip down memory lane (or simply want a bomb ass cinnamon roll, head to the pantry with this recipe in hand:

SAM_0052

Dough Ingredients:

  • 2 pkgs. yeast
  • 2 cups warm milk
  • 1/4 cup plus 1 tbsp brown sugar
  • 1 tsp salt (omit if you use salted butter)
  • 2 tbsp softened butter
  • 5 cups all-purpose flour (for softer dough add 1 egg & increase butter to 1/4 cup)

Filling:

  • 3/4 lb butter
  • 1 1/3 cups sugar
  • 1 1/2 cups brown sugar
  • 3 tbsp cinnamon

Glaze:

  • 2 1/4 cups confectioners sugar
  • 1/2 cup warm water
  • 1 tsp vanilla


Dissolve yeast in milk. Add sugar, salt & butter. Mix Well. Add flour gradually mixing well after each addition. Knead and let rise until double in bulk. Heavily butter two 9×13 pans. Lightly oil board (or flour counter) and roll out dough into a 1/4 inch thick rectangle. Spread filling evenly over dough. Roll up tightly, sealing edges. Let rise until double.

Bake in a preheated 350 degree oven for 25 minutes.

Glaze as soon as they come out of the oven.

IMG_20180626_161306_844

I have to credit my cousin for sharing this recipe (Thanks Cuzz!) & http://www.cook.com

Note: I only baked 1/2 of a batch tossing the other 1/2 in the freezer without adding the filling & before the second rise.

The dough freezes well for future cinnamon roll treats! #thereisyourtwofer

Do you have a favorite from past school days? Yeast Rolls were my #2!


Til Next Time ~

Domesticated Rebellion

Disclaimer: This specific writing does not contain affiliate links but my site does. Meaning when you visit ~ if you click & buy, I could be compensated.

So, Thank You!