TACO Seasoning

TACO Seasoning – You make yourself!

I don’t know about all y’all but I never use a complete package of store-bought Taco Seasoning. In my opinion, the flavor just isn’t completely right so typically I’ll use 1/2 package. While I try to save the other portion, it never happens. The rolled up package gets tossed into the trash and wouldn’t you know it, I’ll forget that tidbit just when I need to remember it! Calling all that have been there…

Well no more… No more will I only get 1/2 when I want it all.. LOL

I found (and have since tested) the perfect seasoning mixture for taco meat. It isn’t over powering. It isn’t too spicy and it doesn’t have all of the added extras you find in the pre-packaged version.


SAM_0376

Ingredients:

  • 1/2 tsp Garlic Powder
  • 1/4 tsp Onion Powder
  • 1/2 tsp Oregano, dried
  • 1 tsp Black pepper
  • 1 tbsp Chili Powder
  • 1/2 tsp Paprika
  • 1/4 tsp Red Pepper flakes
  • 1 tsp sea salt
  • 1 1/2 tsp ground Cumin

Mix everything together then add a tablespoon at a time to your Taco meat, taste testing as you go.

I used 2 tablespoons on Taco Salad for the hubs & I which was perfect!

Do you have a spice blend preference for your kitchen? If you are new to the spice world as I was, you may appreciate this beautiful House of Spice – 33pc Ultimate Organic Spice started gift set in a beautiful gift box. A perfect gift for your home cook! Check it out here.

Til Next Time ~

Domesticate Rebellion

THRIVING ~ Have you witnessed the testimonies? It’s not about weight loss; it IS about feeling better from the inside out! If interested I would love to help you! Knowledge is Power! Sign-up for a FREE account & information at https://domesticated.le-vel.com

 
  • DISCLAIMER: This post may contain affiliate links meaning if you click & buy, I may be compensated. So, Thank you!


Brownies from Scratch

Brownies from Scratch

Dudes — the #twofer for Brownies from Scratch recipe is 1st a wonderful fudge type brownie (right out of the oven) OR 2nd let it stand for a moist cake like consistency when left to completely cool. Two results – One recipe! #Score

Anyway you like it ~ Anyway you want it ~ there simply are not any wrong answers here!  😉

This makes one 8×8 pan. Just big enough to satisfy a hungry grand & her Papa; (plus, leaving a few for a grand breakfast the next morning!)

0713182123

Ingredients:

  • 1c sugar
  • 1/2c flour
  • 1/3c cocoa
  • 1/4 tsp salt (See Note)
  • 1/4 tsp baking powder
  • 2 eggs
  • 1/2c vegetable oil
  • 1 tsp Vanilla

Mix everything together thoroughly, ensuring there are no lumps or bumps. Spray an 8×8 pan with PAM or grease with butter. Preheat oven to 350 degrees. Bake for 20 – 25 minutes.

Note : I happen to think these were great just as they were BUT our grand is honing in her palate to which she informed me “there was too much salt”. So, may I suggest a tasting before baking to ensure the salt factor isn’t over powering for your palate!

And seriously, I encourage you to play around with texture & flavor by tossing in some roasted pecans, walnuts, or almonds. Another lovely combo is to swirl in 1/4 c peanut butter or chocolate chips. The options are endless!  0714181010

Brownies from Scratch can be stored (or gifted!) by mixing-up all of the dry ingredients in a Ziploc bag. Be sure to label the outside with wet ingredients, oven temperature and timing. Perfect for a quick late night craving or as an addition to a gift basket for a new mom or college student.

I’m always searching out new recipes and while these are sure to tame the cravings of chocoholics everywhere, I came across them totally by mishap. Y’all know I go to Pinterest for inspiration from other cooks. It was there, I came across a pin for brownies leading me to www.afewshortcuts.com and Amanda who shared a different scratch brownie recipe. However, I quickly realized the pinned shortcut recipe wasn’t the same as the recipe image that caught my eye. And full disclosure; Brownies from Scratch was copied from the image.

I sure wish I knew who to thank for sharing. If you know who curated this lovely gem, won’t you send them my way? Click to be taken to the original pin.

Do you have a young aspiring cook in the family?

Stonewall Kitchen Farmhouse Batter Bowl GiftEncourage their passion with this Stonewall Kitchen Farmhouse Batter Bowl Gift (Click Here) Inspiring breakfast everywhere!


Till Next Time ~

Domesticated Rebellion


Disclaimer: This writing contains affiliate marketing links. Meaning, if you visit, click & buy – I could be compensated. So, Thank You!


Home-made Sloppy Joes

HOME-MADE SLOPPY JOE SANDWICHES

Easy to make, easy to serve and even easier to clean up. #Tripplehitter

Sloppy Joe sandwiches; a perfect simple dinner whipped up in no time when my babygirl & family unexpectedly came to visit for the day. I don’t have to tell y’all moms how awesome it feels to have your adult kiddos want to come over ‘just because’. No hidden agendas, not needing or wanting anything – just the desire to hang out. ♥

My heart ♥loves♥ visits like that!

Thinking of dinner earlier that day, I had already thawed 1-1/2 lbs of ground chuck. And while visiting & watching TV, I randomly started looking for recipes that would stretch enough to feed all of us *without* my having to run to the grocery store.

That’s when Pinterest (♥) showed me a pin “The Best Sloppy Joes”! Something that was a staple for me as a child but not so much for my own kiddos when they were growing up. I can honestly say it’s probably been 15 YEARS (or more) since we’ve had “Sloppy Joes” because my way was to use Manwich Sauce & the hubs was never a fan

0712181757

Until now! This is a winner for dinner at my house. No lie, every one of us had second helpings of this recipe (even my most picky eater!) #winning 🙂

So ~ if you’re looking for a meal that is hearty, easy, inexpensive, made with everyday pantry staples and let me not forget filling – then try this recipe out. Perfect for the next time you need a quick dish to satisfy the hungry mouths around your table!

Ingredients:

  • 1 lb of ground beef/chuck
  • 1 small sweet onion, chopped
  • 1 8 oz can of tomato sauce
  • 1/2 cup ketchup
  • 1 Tbs Brown Sugar
  • 1 tsp ground mustard
  • 1 tsp white vinegar
  • 1 Tbs Worcestershire sauce
  • Salt & Pepper to taste
  • Bread or Buns
  1. Cook your hamburger meat with the onion, then drain, adding it back to your skillet. (I halved my meat as my son in-law is allergic to all things onion!)
  2. Make your sauce by mixing the rest of the ingredients in a small bowl then add to your drained meat; simmering about 10 minutes.
  3. Toast your buns (or not) & top with your favorite condiment, add some cheese (or not), then heap a ladle of the meat mix on your buns, adding to your plate chips, veggies or whatever your flavor and Dig In! (Be sure to have a napkin handy!)

I already know I’ll be making this sooner than the next 15 yrs!

Note: My usual fashion is to provide #twofers; an original recipe that inspires my remake. While I can remake this adding other ingredients such as sweet peppers or garlic, I chose not to because it is incredible just as it is. Thank you Meggan for sharing this recipe! Y’all should check out her other goodies at www.CulinaryHill.com!

Tell me about a favorite of yours to make when company comes over.

Til Next Time,

Domesticated Rebellion

Disclaimer: This particular writing does not contain affiliate links but my page does. Meaning, if you visit, click & buy, I could be compensated. So, Thank You!


Cinnamon Rolls

Cinnamon Rolls ~ Old School Recipe

A single place where good & gooey and sweet & sugary combine together with unforgettable buttery flavor.36254916_10211428705136646_4452179037657235456_n

Impressingly it was pure nostalgia coming from my oven the afternoon I decided to try these on for size. A whiff of reminiscences crepted thru my kitchen to fill every room in the house. Provoking memories of yester-year while inticing current hunger… and, instead of satisfying that hunger with something resembling lunch ~ I waited.  I waited for these beauties to be done. Correction: WE waited.

Um… Dare I testify: don’t do that!” For Realz! This is NOT one of those “do as I do” moments. Otherwise you will accidentally eat them all like we did! (well, almost all) #sugarrush

I’m not sure “how old” equals “old school” either but if you are, let’s say, 30 years or older then you might recall when fresh hand-made cinnamon rolls were actually rolled out by your cafeteria ladies. SAM_0049

They were one of the best things about school.

Of course, this was wwwwaaaayyyyy before we cared about the calorie intake of our student body. When pizza was tasty, sloppy joes were greasy and whole milk was available in white and chocolate! Before the public school lunches were hijacked.

Oh, how I recall wheeling & dealing for any extra cinnamon rolls too. I’d wipe tables, put up trays, stack chairs. #MmmMmmSoGood

My fave way to eat them was to unwind each roll so I could enjoy the soft tender dough, layer by layer. Occasionally, anticipation or lack of remaining lunch time would force me to simply sink deep into the center, combining all of those layers into a single sticky mouthful! Either way, I always tasted the sugary glaze first, followed by nuttiness of pecans ~ a slight sweetness from the dough ~ ending with a buttery, sugary, cinnamonSAM_0051

burst bouncing over my taste buds beginning at the tip of my tongue with each bite.

In my opinion, even the cinnamon rolls sold at the State Fair are not as good as the ones from school ‘back in the day.

So if you’re ready for your taste buds to take a trip down memory lane (or simply want a bomb ass cinnamon roll, head to the pantry with this recipe in hand:

SAM_0052

Dough Ingredients:

  • 2 pkgs. yeast
  • 2 cups warm milk
  • 1/4 cup plus 1 tbsp brown sugar
  • 1 tsp salt (omit if you use salted butter)
  • 2 tbsp softened butter
  • 5 cups all-purpose flour (for softer dough add 1 egg & increase butter to 1/4 cup)

Filling:

  • 3/4 lb butter
  • 1 1/3 cups sugar
  • 1 1/2 cups brown sugar
  • 3 tbsp cinnamon

Glaze:

  • 2 1/4 cups confectioners sugar
  • 1/2 cup warm water
  • 1 tsp vanilla


Dissolve yeast in milk. Add sugar, salt & butter. Mix Well. Add flour gradually mixing well after each addition. Knead and let rise until double in bulk. Heavily butter two 9×13 pans. Lightly oil board (or flour counter) and roll out dough into a 1/4 inch thick rectangle. Spread filling evenly over dough. Roll up tightly, sealing edges. Let rise until double.

Bake in a preheated 350 degree oven for 25 minutes.

Glaze as soon as they come out of the oven.

IMG_20180626_161306_844

I have to credit my cousin for sharing this recipe (Thanks Cuzz!) & http://www.cook.com

Note: I only baked 1/2 of a batch tossing the other 1/2 in the freezer without adding the filling & before the second rise.

The dough freezes well for future cinnamon roll treats! #thereisyourtwofer

Do you have a favorite from past school days? Yeast Rolls were my #2!


Til Next Time ~

Domesticated Rebellion

Disclaimer: This specific writing does not contain affiliate links but my site does. Meaning when you visit ~ if you click & buy, I could be compensated.

So, Thank You!

Bacon Wrapped Smoked Sausage Dogs w/ Cheese

BACON WRAPPED SMOKED SAUSAGE DOGS with CHEESE

You read that right… BACON… and not just one slice but two thick-cut strips! SAM_0021 - Copy

Now I’m talking some YUM! Seriously, WHO Doesn’t ♥ BACON? Is there anything BACON doesn’t go with?

Bacon wrapped around a smoked sausage and cooked to perfection. YES!

                                       SAM_0032

These were the perfect dish for a rainy wet day this weekend. Old school with a twist. 

What you get is exactly what you see; a scrumptious bacon sausage, engulfed in creamy melted cheese that crisps up if left long enough… all wrapped in a toasted bun slathered with garlic aoli (or whatever your flavor) & ready when you are! Kids ♥ these – the hubs ♥ these plus they provide a simple twist to the ordinary blah ‘hot dog’.

So for two dogs I used: 

  • Two smoke sausages
  • Four thick-cut bacon slices
  • Two hot-dog buns
  • garlic infused mayo 
  • Asaeero Cheese (Found in the Mexican food aisle)

First, Wrap your sausages with 2 slices of bacon each then cook in a non-stick skillet on  Medium-Low until done. When the dogs are cooked thru, allow to cool before slicing down the center to open (NOT CUT IN HALF). Allowing the dog to cool before cutting should keep the bacon intact so it does not pull away from the dog when cut into.

Toast your buns followed by a healthy layer of your choice of spread, then set aside. I used a garlic infused mayo spread on both sides, & generously too!

While allowing the dogs to cool go ahead and wipe out the pan from the  bacon grease and put two piles of shredded cheese. Allow it to melt and bubble.

SAM_0024 - Copy

Next, lay the opened side of the bacon wrapped dog, face down in the cheese. mix it around so it gets up into and over the dog.

This cheese is like a mozzarella with a buttery flavor but better melt (IMO). Its mild and works perfectly with the smoked sausages.

SAM_0032


When you flip this from the pan to the bun don’t flip out. It is not burned! Remember, the cheese will crisp/crust. The color doesn’t implicate the flavor..

I found the inspiration for this while watching Pati’s Mexican Table on OETA. Her recipe included an avocado & jalapeno relish that I omitted; plus I switched up from her hot link to a smoked sausage.

SAM_0034

So – in my customary form feast your eyes on yet another #twofer for your taste buds! Mexican inspired Domesticatedly delivered in my own rebellious ‘use what I have’ style.

There isn’t anything not to love in each and every bite!

MmmMmmm Good! Mix it up too! Add some grilled onions or bar-b-Que sauce. Truthfully, if my avocado had been good it would have topped this baby perfectly! TaTah; Time to Enjoy!

Maybe you already have a creation similar?

If you do, drop me a line and let me know!

Til next time,

Domesticated Rebellion


Disclaimer: This post does not contain affiliate links but my site does. Meaning if you click and buy, I could be compensated. So, Thank You!

Rustic Pizza Dough

One of my all time favorite things to eat is and always will be PIZZA! Rather from scratch at home or dropping in at one of the popular pizza joints that are popping up everywhere – it is one of the ultimate satisfying ‘fast food’ ‘finger food’ options I just can’t say no to.

When I was younger I enjoyed thick crust pizza ‘pie’. Something you sank your teeth into but could still hold with your hands; (occasionally requiring a fork.) However, taste-buds, husbands and kids bring about expansion… In this instance, expanding my tastes and ultimately my hips therefore thin crust became a fave. 😉

Specifically we enjoy a crust so thin it has rips and tears from being stretched! It has burnt edges with bubbles filled with air that crunch noisily when bitten into.

Mmmm, do you see that? That crunch? Paper thin and so so good. Even though I know we eat initially with our eyes – let me assure you the taste is even better!

Previously I found a nice enough “10 minute” dough recipe; Fast & easy but it had a ‘chew’ versus a ‘crunchy bite’. So where do I go for inspiration? 

-to pinterest ♥ and the net-

Where I found the perfect Rustic Pizza Dough that if you have time to wait on its rise, you will absolutely fall in love with the authenticity!

Let this transport you to the outside patios of Italy. I’ve made it as far as my porch.

Perhaps you’ll make it to Italy for me! LOL

Typically, when we have pizza night at our house, it’s usually hand in hand with having a few grands over. I recall pizza dough being the first thing we attempted to make with our first grand little. Something ‘hands on’ allowing lil fingers to play, all while being in the midst of what was happening in the typical hub of the home; AKA the kitchen!

I personally do Mise en place (French pronunciation: ​[mi zɑ̃ ˈplas]) which is a French culinary phrase meaning “putting in place” or “everything in its place.” 
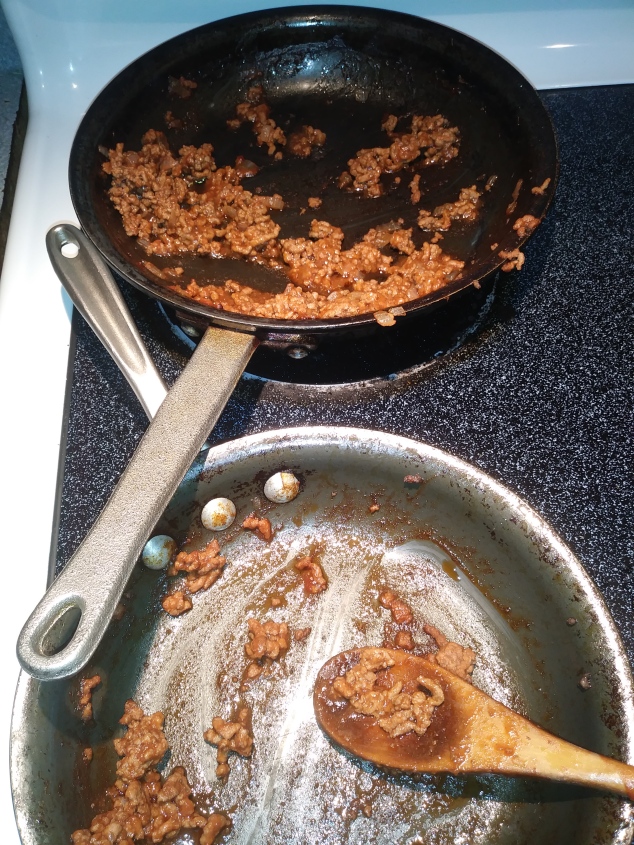
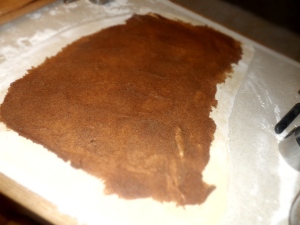
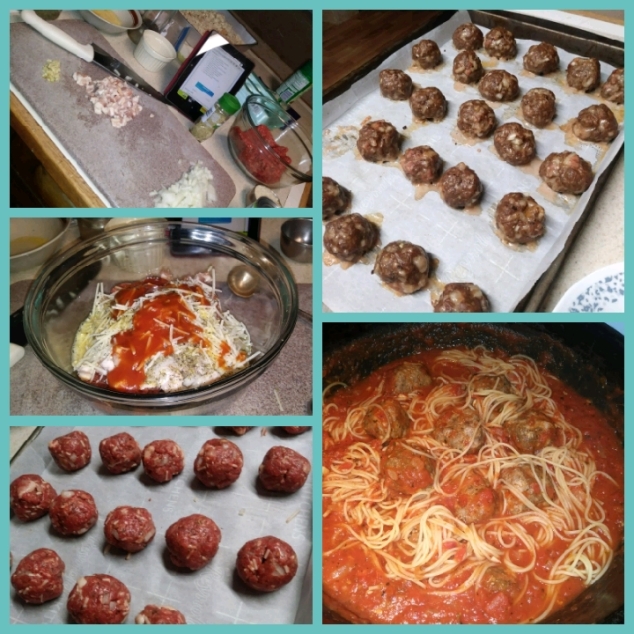
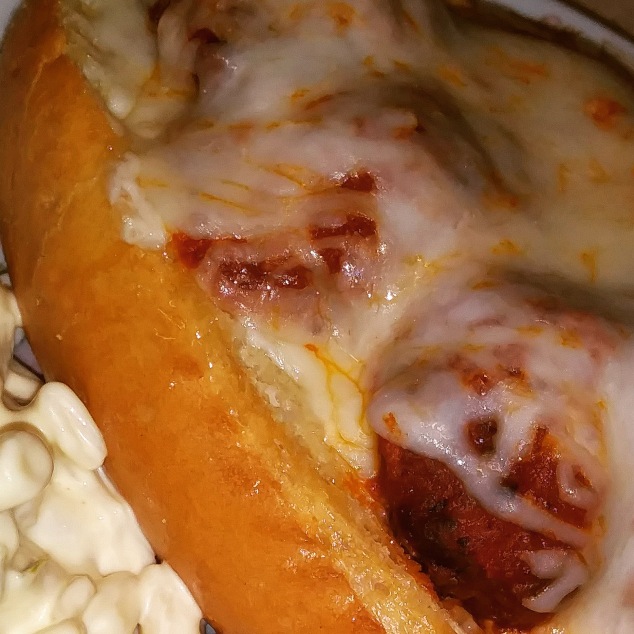
I gather everything up that I will need before starting, including the various toppings that will be used. I pre-cook most toppings too since the time in the oven isn’t really long enough to accommodate. Of course, this is entirely personal preference – so feel free to rock out your own. That’s exactly what I do!

Crust Ingredients:

  • 5 cups AP flour (approx) + some for dusting
  • 1 1/2 tsp active dry yeast
  • 1 1/2 tsp kosher salt (original calls for sea salt)
  • 2 1/4 cups COLD water (yup, COLD)
  • 1 tbsp EVOO

While gathering the ingredients, that is a good time to start pre-heating your oven to a min of 500 degrees. The original recipe and my own experience concur a pizza stone makes all the difference too. Be sure to have yours in the oven during the preheat process.

I used a kitchen aide mixer but not to fret, this can come together by hand nicely too. So use what you have – it’s really hard to fudge this one guys! 🙂 Incorporate all dry ingredients together then add COLD water. TaDah!

No proofing necessary! (That’s a win win in my book!)

Mix, adding additional flour as needed. The dough should be slightly sticky but not enough to remain on the side walls of your mixer. It’ll take between 8-12 minutes to combine. When finished, remove the dough and cut into 6 rounds. Don’t worry about extras — this recipe freezes exceptionally well!

Place the rounds on a cookie sheet, drizzle with the EVOO, cover with plastic wrap or a damp cloth and walk away. Not really ‘away’ but let it rest for an hour or so in a nice warm spot. The yeast will activate surprisingly well, doubling the size of each round. This time allowance gives ample opportunity to pre-cook your toppings if your into that kind of thing.

Once the dough has risen, take out one of the rounds to work while keeping the others covered. This will ensure they do not dry out. Use a slight dusting of flour on your counter to roll out your dough the size of your pizza peel. *Dust your peel so your dough will slip off onto the stone without sticking.

Pre-bake each crust at high temp for 1-2 minutes to ensure a crisp crunchy texture before adding any toppings. It is seriously worth the minimal effort! Remove the pre-baked crust from the oven. Keep in mind Less is More if you desire crisp & crunchy! Use your favorite sauce, prepared toppings & choice of cheese then back into the oven between 5-7 minutes.

Bam! Dinner Is Served!

What is your favorite pizza? Do you prefer thin crust or thick crust? Did you know pizza is a fabulous way to use left over meats, veggies and the last tidbit of various cheeses? Is there a special recipe you do with your littles or grands? Let me know how it goes in your kitchen!

Til next time ~

Domesticated Rebellion

Shout out to Ciao Florentina for the original recipe posted in 2011 at https://ciaoflorentina.com/about-florentina/ who shares her journal of simple living, filled with joy, laughter and sinfully delicious recipes!

Disclaimer: This post contains no affiliate links but my site does. Meaning if you click & buy, I could be compensated. So, Thank you!


Crossing Lines

It was a beautiful Sunday morning when the hubs & I embarked on what was going to be our last bike ride for a few weeks. We left out later than scheduled to hit a car/bike show being held in a few towns over. When we arrived, it was obvious most of the contestants had done one of two things. Either 1) they left or 2) they hadn’t arrived. It was an either/or thing because the ‘show’ was lacking exhibits even though there was a continuous flow of vehicles both coming and going.

But eh, whose to say; the point of the day was to ride – so – we got on our bike & headed off in search of the next best pairing. Food & Beverage type pairing. Specifically, Pizza & Beer. This particular day however I did not get pizza and I did not get beer.

From the back of our motorcycle I witnessed a driver travel almost 40 miles; erratically back and forth over both lanes, median and shoulders of a divided highway, entering and exiting two towns, having several ‘close calls’ but miraculously not hitting anyone. We encountered this driver after leaving my mother in-laws grave site which just so happen to be en-route for Pizza & Beer…

…We turned onto Highway 99 heading south. We had just gone a couple of miles when a light-colored truck appeared beside us – then immediately off the road into the median, swerving back quickly into the inside lane – then rapidly into ours! The hubs immediately slowed down to stay behind the driver. When we thought it would be safe to pass, every singe time this vehicle would either careen into our lane or the shoulder or median (depending on which lane he was in at the time) then jerk back. You couldn’t predict where the truck would go next.

Admittedly, I was kinda freaking out being on the back of a motorcycle. My heart was pounding out of my chest & my mind told me we were witnessing a crash in the making!

I tried to call 911 but it was no use being on the back of the bike; the wind made it impossible to communicate. I hung up. 911 called me back – but again – bike! That’s when a Ford truck rolled up behind us – then passed. I later learned the passenger called 911 when seeing the danger this driver was not only putting themselves in but also anyone  they encounter on this stretch.

The windows of the truck were dark. I wasn’t able to determine what I was seeing.  The visual from following behind, looking thru the back window to the windshield appeared as a shadowy profile resembling that of a small person. There was repetitious movement back & forth from the driver’s side to the passenger side which looked like a fight. Jerky motion of a silhouette followed by the vehicle swerving. As we continued to follow thou, with voices raised the hubs & I started to question what it was we were seeing? Perhaps it wasn’t a person but a persistent dog wanting in the front seat? Maybe a couple of helium filled balloons? A blow-up doll? (thinking of the 405 street racer here!)

The movement consistently repeated — the idea of a fight was still our first instinct – but we couldn’t be certain because the movements were identical. Any fight I’ve ever been in or witnessed never demonstrated a constant ‘form’ of any kind.

The couple in the Ford truck followed the driver with us another 10-15 miles on the highway before entering the small town of Prague.  The driver drove right thru main street never braking for speed signs or oncoming vehicles. Finally, on the south-side of town we noticed an officer in their vehicle in a parking lot. With both of us honking, arms waving and lights flashing the officer was alerted. From there the pursuit started.  This single law enforcement vehicle followed behind the driver with lights flashing, sirens blaring all while trying to keep the driver from crossing into on-coming traffic. I’m not referring to a couple of times either!

It took so much longer than I would have ever imagined for the officer to secure back up assistance with this driver. We passed over I-40 entering the next town where finally back up was waiting with the roads blocked allowing this driver to pass through the intersection without wrecking or causing one. As the chase continued we were caught by a red light. Then another. Before losing sight of the driver leaving town, I noticed three or maybe four different agency vehicles arriving to offer assistance.

When the light changed to green we decided to continue following. I wanted to see what was happening; if the officers were able to pull the truck over. We drove about a minute before seeing the Ford on the shoulder up ahead. Pulling the bike around the inside of the Ford, we see the drivers truck.

Apparently the driver had just been maneuvered by OHP off the road. When I looked up after getting off the bike I saw an officer retreating from the crash back to the officers’ vehicle donning a bullet proof vest. I could hear as Officers over the loud-speaker told the driver to get out.

There was some conversation that wasn’t audible to me. I could only hear when they would raise their voice or spoke over the loud-speaker. I heard over and over the officers tried to get the driver to open the door. To exit. They even shot non-lethal canisters (Pepper spray canisters I later read) at the windows in effort to break them so they could gain a visual as no one knew how many were in the truck.

They continued to try to talk to the driver.  To persuade the driver to come out.  I saw the door open slightly, followed by officers yelling “put it down” “put down the blanket” “put down the blanket and put your hands up” and I heard: “weapon”. That is when I hit the ground as I had no desire to meet up with any stray bullets.

I can’t tell you how many more times he was asked to come out, to open the door, to put down the weapon, but I can tell you the driver of the vehicle leveled what has now been reported as an AR toward the officers.

Officers from more than one agency then opened fire.

The driver was pronounced dead at the scene.

The driver was the only occupant in the truck.

…………………………………………………………………………………………………………………………………………

It was a day or so before a name was released. It’s been another day or so now & the driver has a face.

I hope no one mistakes this post.  The officers reacted as trained. They did everything possible to get the driver to exit the vehicle.  The driver left no other recourse of action.

I admit, Yes, I was anxious for him to be apprehended. He almost ran us off the road and my adrenaline was pumping. I honestly thought we would see a cracked-out meth head with their girl after a long weekend binge come out of the cab of that truck.. I expected an arrest.

Instead a life was lost.

The loss of life itself immediately changed the hardness of my heart toward the driver & softened my headstrong bitchiness about ‘almost’ being his victim. I don’t know if he was on anything causing his out of control driving such as alcohol or drugs but I read this man was a veteran who served our country to protect me and mine. I also read he was dealing with PTSD. From public posts I was able to ascertain he just needed help. He was searching for help. And I find my heart breaking.

I am so sorry his story ended as it did.

In the same world where technology prevails with AMBER alerts and SILVER alerts – I have to wonder — would an alert system of similar capabilities helped in this situation? I don’t know if anything could have prevented what was set into motion before our encounter but I feel its worth the discussion being brought to the table, isn’t it?

May God protect and watch over this family as they lay their hero to rest.

*Out of respect for the fallen & his family, believing this wasn’t his finest hour, I have purposely omitted his name, branch of service and vehicle information in hopes the next topic of discussion may be in the area of prevention; not blame.

Til next time,

Domesticated Rebellion


Garlic Bread Meatball Subs

GARLIC BREAD MEATBALL SUBS

Hi everyone,  Have I got something Goo-licious for you today! Did you see my last post? Those beautiful home-made Italian Meatballs tossed into some angel hair pasta?

O. M. G. ~ they were Juicy, Tender, and #score ~ Today we’re going for round No. 2.  These lovelies if frozen individually allow you to heat up just a couple for a quick snack or add several to a bowl of pasta or…

…as I mentioned when I made them I was looking forward to subs and here we are… First picture is a throw back. Ya know, you eat with your eyes before your stomach!

5801

Oh baby, these are so sinfully juicy & saucy; dare I say GOO-LICIOUS! (haha, I think I already did) Anyway peeps these are Nothing short of Yum!

I only snapped one picture of the sub ~ Oopsie ~ I promise I am trying to get better at that LOL..

Just look tho! I think you can see the goolicious goodness that sucked me in, right? I devoured mine in record time with #noshame 🙂

IMG_20180504_224618_871

So Let’s get busy!

Start by preheating your oven to 400 degrees. Then grab up the following for the sauce: (open the meatball recipe HERE)

  • 1/8 t garlic powder
  • 1 can tomato sauce
  • 1 t Italian Seasoning
  • 1 T EVOO
  • 1/8 t onion powder
  • salt and pepper
  • French bread, Ciabotta, or Hoagies (Use your fave)

Add everything EXCEPT tomato sauce into a small saute pan. Turn up the heat, sauteing the spices in the  oil. Once hot & the spice aroma starts to mellow out (2-3 minutes), remove pan from burner & carefully add tomato sauce (please take precaution as the sauce is gonna splatter some.) After adding the sauce, stir to combine with the herb oil then add in the meatballs. Reduce the heat to low in order to allow the sauce to thicken up slightly.

While reducing your sauce, open the bread; set aside. Melt butter & garlic powder together/stir. Use a pastry brush to spread the melted mixture across both sides. PRE-Bake in the oven until a light golden hue starts, then remove.

Get out your choice of spread – mayo, ranch, pesto – whatever your flavor spread it out, then plop down  3 to 4 meatballs between the slices. Give’m a gentle squeeze so they get in there pretty good. Next spoon sauce across the top, the front, the back and everywhere in between. You get the picture…. Top each with mozzarella and bake until the cheese is melted & gooey & delicious.

Goo-licious! ❤

Serve with your favorite side or enjoy by itself; one was plenty satisfying for me!

The inspiration for these gorgeous beauties, discovered on Pinterest of course, came from Aleshia over at Just Learning Life. Stop by and see what else she’s been cooking!

Till Next Time ~

Domesticated Rebellion


Italian Meatballs in 30 minutes

ITALIAN MEATBALLS IN 30 MINUTES

How would you like to find a recipe that is super delicious, inexpensive, ready to eat in 30 minutes PLUS freezes well? I just so happened to stumble across such a recipe, so I did what I do best tweaking it slightly with the items I had on hand & dinner was served! I’m learning it’s okay to mix it up. Switching out different meats with different fat content to obtain different texture and flavor. I’m finding my own ‘palette’ while also discovering tried and true classics. For example, I added bacon to this recipe as the ground beef I had was ‘extra’ lean. This helped in the juicy department. BONUS: the bacon also provided a nice rich smokey depth. I love finding & sharing simple easy satisfying dishes and this my friends, scored a 10! I hope you enjoy.

#WinnerWinnerMeatballDinner folks! 🙂

You will need the following:

  • 1.5 lbs extra lean ground beef
  • 3/4 c bread crumbs (I used plain home-made)
  • 1/4 small sweet onion, finely chopped/minced
  • 3 garlic cloves, minced
  • 4 strips bacon, chop
  • 1 lg egg
  • 2 T tomato sauce
  • 1 1/2 T Italian Seasoning
  • Salt /Pepper (to taste)
  • 1/4 t red pepper flakes (totally optional, but very good)

Preheat your oven to 375 degrees. Mix everything in a single bowl until well combined. I used a 2 oz  scoop (bite size) for equal size meatballs placing them on a sheet pan lined with parchment paper. Bake between 20 – 30 minutes depending on your oven. A single batch makes twenty meatballs.

5801

With it being just the two of us I get two meals out of each batch. Angel hair pasta w/ homemade sauce was tossed together in a hurry tonight but I’m really looking forward to meatball subs tomorrow. #leftovers #twofer

On Pinterest I found a pin leading me to The Slow Roasted Italian where I read their recipe for Italian Herb Baked Meatballs thus inspiring me to make my own. Visit Donna & Chad for some lighthearted love inspired recipes including other meatball variations. 

Do you have a favorite meatball recipe? A secret ingredient? Perhaps a memory of helping mom or grandma in the kitchen? That is one of my goals. Creating memories in the kitchen with my grands ♥ Savoring moments one bite at a time ♥

Til Next Time ~ Be Blessed

Domesticated Rebellion


CBD; more than I bargained for!

TWO-MONTHS! That is how long it’s been since my last migraine; that is also how long I have been experimenting with CBD. CBD is legally sold in most states & Grand Opening signs are showing up everywhere. Research supports claim of the extracted compound containing some truly bad-ass medicinal properties; and not just for humans but for our pets too! 

BTW, I say most states because it is a common misconception CBD is legal nationwide; it is not. It is still classified as a Schedule 1 drug in Texas. The Compassionate Use Act of 2015 allowed the set up of Texas dispensaries to be licensed for cultivation, production and distribution but only to uncontrollable epilepsy patients and only prescribed by physicians meeting extreme licensing criteria relative to the study/treatment of epilepsy.  Statewide in Texas there are only 18 physicians who are licensed to prescribe its use and only 3 licensed dispensaries. (Texas Tribune Feb 2018)

So what is CBD?

CannabidiolCBD—is a cannabis compound that has significant medical benefits, but does not make people feel “stoned” and can actually counteract the psycho-activity of THC. The fact that CBD-rich cannabis is non-psychoactive or less psychoactive than THC-dominant strains makes it an appealing option for patients looking for relief from inflammationpainanxietypsychosisseizures, spasms, and other conditions without disconcerting feelings of lethargy or dysphoria.

I’ve never kept it a secret that I’m a supporter of all things cannabis.  The classification of the plant has never been substantiated with evidence to support claims of it being a “gateway to stronger drugs, the cause of Jekyll & Hyde traits, or creating a lust for  violence”. Quite the contrary; instead of violence you might lust after the remote control, your bed or a box of Pretzel Flips but…

Oh wait, that is the THC effect 😉 (LOL)

Dislike or approve, this post isn’t about legalizing marijuana for the THC. It’s about the natural Cannabidiol extracted from the plant for medicinal purposes. Based on my own history, I can say I have never experienced the medicinal properties of CBD ~ until now. Before CBD, I was averaging at least one migraine a month. I refer to migraines because of the varying severity; one could disable me anywhere from a few hours to a few days. If medical attention is sought for relief, then the ‘hangover’ effect is felt for a day or so depending on which ‘cocktail’ is prescribed. UGH! And for the record, it isn’t JUST the lack of migraines that has me sharing my experience.. It’s that since I took my very first 60 ml dropper containing 250mg CBD (THC Free)…

My body no longer achesAnywhere ~ and within only a few minutes. 

See, after making our purchase we took our first dose in the parking lot. Directly after, we headed to the grocery just down the road where I shopped the entire store without ever touching my back from soreness or stiffness. Yippy Damn Skippy! My hips did not ache! I’m almost reluctant to accept this. My brain is having a hard time processing that I’m not aching. Unbelievable – almost inconceivable yet very, very true. Needless to say, since day 1, I have continued a rate of 2 droppers/day (AM / PM). This regimen appears to be more than adequate in relieving not only my headaches but also my lower back pain, joint pain and lately I’ve noticed my appetite has decreased. I seem to have consistent energy and my sleep pattern appears to be mellowing back to somewhat of a norm. I am not exaggerating either. Quite literally, I don’t feel old anymore! 🙂

I’m amazed at my own results and I will continue conducting my own research. Posting my own conclusions for educational and informational purposes about natural alternatives to traditional big pharma companies. The links below are popular and informative so you the reader can further your own knowledge base and be informed.

I would be interested in hearing from you if you have tried CBD & how it has helped you? Did you get more than you bargained for?

Til Next Time,

Domesticated Rebellion

Below are links I found to be educational containing the most informative research:


Disclaimer:  I am not an affiliate for any CBD manufacturer or distributor nor am I being paid for any statements contained within this writing. This is my personal testimony of my experience using CBD.